Simplified SVM Level Data Protection Using OnCommand System Manager 9.5


Mahalakshmi G
For an enterprise, data backup and availability after a disaster are key considerations for business continuance. Disaster Recovery is one kind of security planning, where user can protect the data with precautions and recover the data in case of a disaster without data loss.
Storage Virtual Machines (SVMs) are own tenants in an ONTAP Systems. They could represent individual divisions, companies or test/prod environments. Even if a user has more than one SVMs, it might end up with a single point of failure.
NetApp introduced SVM level disaster recovery starting from ONTAP 8.3. SVM DR is a solution which provides disaster recovery capability at the granularity of SVM, by enabling the recovery of data present in the constituent volumes of the SVM and the recovery of SVM configuration. It involves setting up a relationship between a source SVM on a primary site to a destination SVM residing on a DR site. Upon a disaster, the secondary SVM is brought online.
Users can setup SVM Disaster Recovery only via Command Line interface until 9.4.

OnCommand System Manager 9.5 bundled with ONTAP 9.5 provides a simplified and smart workflow to setup SVM Disaster recovery. Ensure both the source and destinations clusters have SnapMirror® license, peered and has ONTAP version 9.5 or above to setup SVM DR.
With System Manager 9.5, Initiate SVM DR workflow from the destination site. System Manager automatically populates most of the values in the workflow based on best practices.
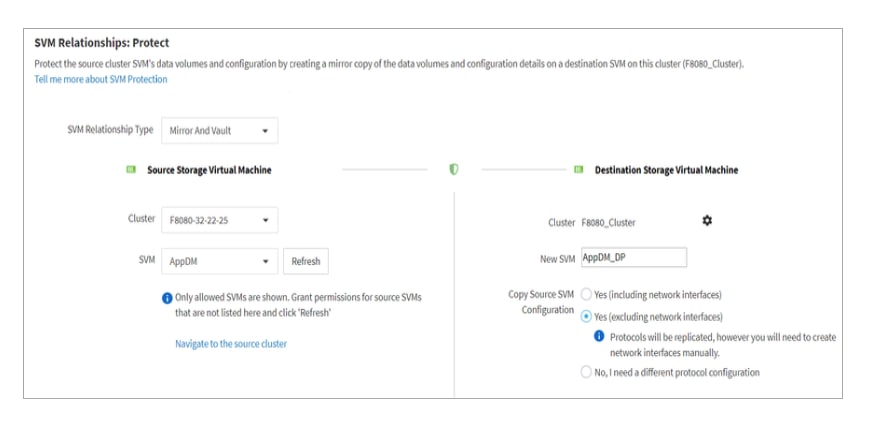
Relationship type can be of either Mirror or Mirror and Vault. User can provide the details for source and destination cluster. As part of SVM DR workflow, System Manager automatically creates a new SVM on the destination site copying the source SVM configuration option chosen by user. It also replicates the copy of all the source volumes under destination SVM.
Copying the source SVM configuration details could be of one of the below options, based on the location of DR site.
- Replicate Protocols including Network interfaces (If the destination site is on same building and id preserve is true, copy source SVM Protocol details along with network LIFs)
- Replicate Protocols excluding Network interfaces (id preserve true with discarding network LIFs)
- Do not replicate, configure different protocols (If destination site is on different geographical location create network LIFs manually, id preserve false)
In SVM DR workflow, under Advanced options, user can tune-in options such as Protection Policy, Protection Schedule and aggregates based on relationship type chosen.

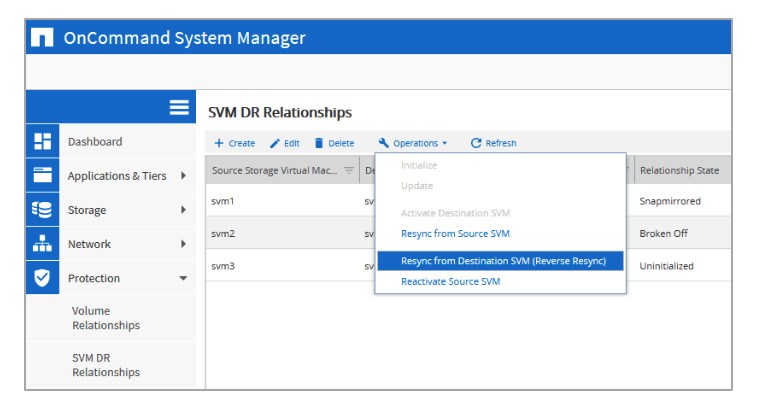
Once the relationship has been setup between Source and Destination SVM, user can perform operations from the destination site such as Initialize, Update, Activate Destination SVM, Resync from Source SVM, Reverse Resync, Reactivate Source SVM and Delete.
In case of a disaster or a failover scenario, user can launch OnCommand System Manager from destination ONTAP system and a single click on Activate Destination SVM option would activate the destination SVM to running state to start serving data, enabling all the volumes to Read-Write volumes.
Watch the OnCommand System Manager 9.5 SVM Disaster Recovery demo that showcases initiating SVM DR and operations performed in case of fail over scenario.
https://www.youtube.com/watch?v=orFtIKuL76k&feature=youtu.be
For more information:
Mahalakshmi G
Mahalakshmi works as Technical Marketing Engineer for OnCommand System Manager. As she is part of Product Management, she loves solving real-world customer issues. She also has a deep passion for automation coding. Apart from work, Mahalakshmi is keen on music and enjoys traveling to new places.