How to Deploy Cloud Volumes On-Premises with NetApp HCI


Diane Patton
What if you could easily manage all of your on-premises data from a single cloud interface? Wouldn’t that make creating volumes easy? Well, now you can! Like NetApp® Kubernetes Service (NKS) on NetApp HCI, NFS-based NetApp Cloud Volumes have been added to our cloud services offerings on-premises, now in preview mode. Cloud Volumes on NetApp HCI is the next step in providing NetApp cloud-based services on-premises.
Cloud Volumes uses the NetApp Fabric Orchestrator in the cloud to create NFS volumes on your local NetApp HCI system, enabling you to maintain control over your business-critical data with a simple interface and API – no storage administrator needed. It’s easy to create volumes wherever and whenever you need them, on-premises.
 This blog covers creating a volume on-premises on your local NetApp HCI system. It discusses why it’s necessary to have data on-premises, the implementation of Cloud Volumes on NetApp HCI, how to set it up, and how to create a volume—all using the same interface and API used in the cloud.
Why do I need my data on-premises?
Although you may be able to outsource infrastructure and services to the cloud, you can never outsource your responsibility for your business data. Maintaining your data on-premises is beneficial (and often required) for many reasons, including:
- Regulatory compliance and security. Due to legal and/or security requirements, you must maintain data on your premises to ensure its integrity and protection.
- Legacy application and infrastructure support. Some legacy applications may need to talk with newer containerized applications. To avoid latency between the older monolithic applications and the newer containerized applications, they need to be in close proximity to each other. These applications also need fast, reliable access to data that must also be on the same premises.
- Secure internal application development and validation. You may need a secure local environment to develop and validate new business-sensitive applications. You don’t want any of the code to be discoverable by others, and volumes must be local to the application for latency reasons.
- Economics. When considering the opex involved in deploying and maintaining a public cloud, on-premises data storage may simply be cheaper.
No matter the reason, it’s always beneficial to have the choice to deploy your applications and data either in the cloud or on your premises,
How does Cloud Volumes on NetApp HCI work?
Enabling cloud services on your local NetApp HCI system enables the management node (mNode) to create a boot virtual machine (VM). The boot VM securely contacts NKS at cloud.netapp.com via an SSL tunnel. NKS then installs a Kubernetes service cluster on your NetApp HCI system. The service cluster is a 4-node Kubernetes cluster that is managed by NetApp. It hosts multiple pods that are responsible for creating, managing, and destroying the cloud services on your local system, at your request from cloud.netapp.com. It also hosts the pods that provide the local endpoints for the secure tunnels to and from cloud.netapp.com.
If NetApp Cloud Volumes is requested as a service, the mNode automatically installs two VMs that contain NetApp ONTAP® technology, along with a mediator VM. These VMs provide high availability for local NFS file services. You can only interface with these VMs through the Fabric Orchestrator in the cloud.
When a request for a new volume is made via the Fabric Orchestrator in the cloud, a signal is sent to a pod in the local service cluster, called the Cloud Volumes API pod. The API pod contacts the ONTAP instances on the local NetApp HCI system to create a volume. After the volume is created, confirmation is sent via the Cloud Volumes API pod back to the Fabric Orchestrator to acknowledge that the volume was created and to allow the Fabric Orchestrator to manage the volume. NFS mount information is also provided on the Fabric Orchestrator.
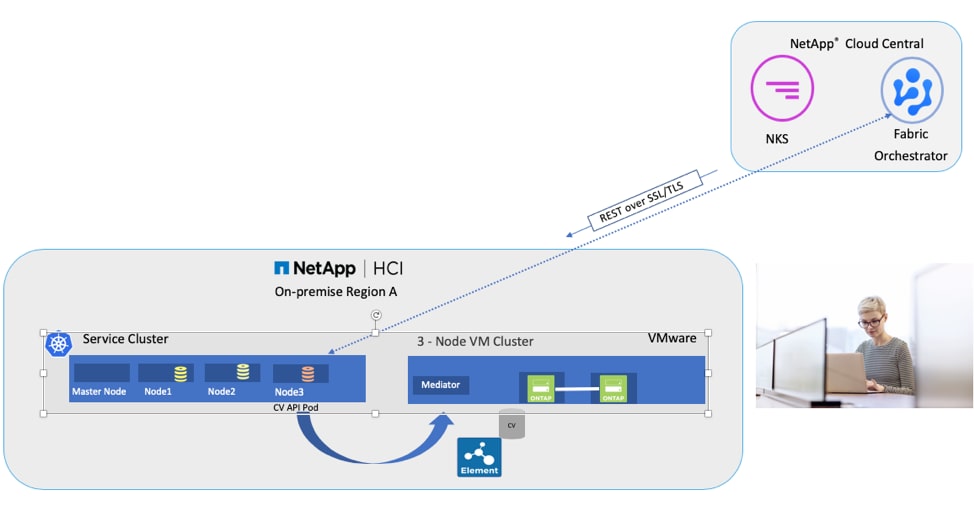
Once you integrate one or more new private cloud NetApp HCI systems with a NetApp cloud account, you can create as many volumes as needed on one or more NetApp HCI systems. Each system is seen as a different private cloud region, analogous to the public cloud. This will allow you to manage either a local system or data in the public cloud using the same interface.
OK, that sounds pretty cool. How do I set it up on my local NetApp HCI system to try it?
Start by setting up a NetApp Cloud Central account, if you don’t have one already. The Cloud Central account provides both the API needed to interface your local NetApp HCI system with the cloud and the GUI interface needed to create Kubernetes clusters and volumes, either in the cloud or on your premises. For more information, see the NetApp HCI Documentation Center.
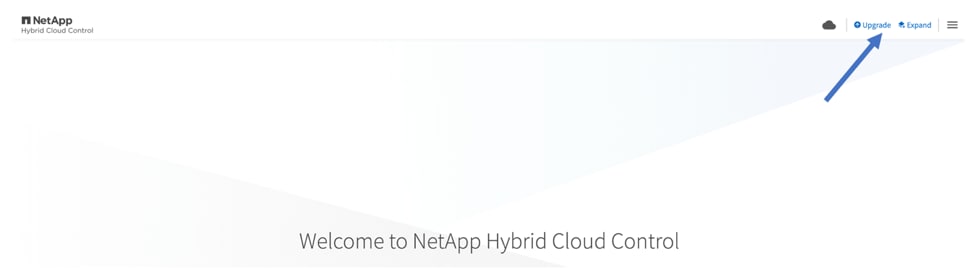
Before starting the integration process, be sure that you are running mNode version 2.2 or later. Version 2.2 includes the application containers required to set up NetApp Cloud Volumes on your system. To verify that you are running 2.2, log in to your mNode Hybrid Cloud Control (HCC). Click the Upgrade button to learn the version. If necessary, you will be given the option to upgrade.
To set up NetApp Cloud Volumes on your premises, follow these steps:
- In Hybrid Cloud Control, click Enable Cloud Services (NKS and CV). NKS is needed to locally deploy the containerized applications required to provide the Cloud Volumes services. If no NKS user clusters are created, you will not be charged for NKS.
- Register your NetApp HCI system with your Cloud Central account and enter the API token.
- Enter your vCenter Datacenter and the cluster you want to use.
- Upload your Cloud Volumes licenses. Two Cloud Volumes licenses come free with NetApp HCI.
- Add networking information.
- Review and click Submit.
That’s it. Now you have a deployable private cloud region to create cloud volumes on your NetApp HCI system. You can repeat this procedure for many NetApp HCI systems, managed as different local on-premises regions. For a demonstration of the process, watch the video Enable Cloud Services.
I’m set up. How do I create a volume on my on-premises NetApp HCI system?
To create a volume on your NetApp HCI system, log in to fabric.netapp.io and follow these steps:- Click Cloud Volumes and then click Create Cloud Volume.
- Select Private Cloud and then select Cloud Volumes on NetApp HCI.
- Enter the characteristics you want for the volume.
- Click Create Cloud Volume.
That’s it! The NFS volume is created on your local NetApp HCI system, and you are given NFS mount information. For a demonstration, watch the video Cloud Volumes.
How do I get more information?
For more information, check out the NetApp HCI Documentation Center, or contact your local sales representative.
We’re looking forward to hearing from you!
Diane Patton
Diane is a Technical Marketing Engineer with NetApp, supporting hybrid cloud technologies. She works with product management, marketing, and development to evangelize, support, and help drive new cloud native technologies into NetApp HCI. Diane has over 20 years experience in the IT industry (Optical DWDM, Layer 2, Layer 3, container networking, container storage, cloud), holds CCIE #2537 Emeritus and is a Certified Kubernetes Administrator (CKA). She also has a BS and MS in Electrical Engineering. When not working on open and cloud-based technologies, you will find Diane playing tennis.